
I’m excited to share with you a way to have all your partners listed on your Facebook!
Unfortunately, there is no way to have multiple partners listed in the “Relationship Status” section, but I’ve found a workaround in the “Family Relationships” section.
Before we begin make sure all your partners are OK with being listed as one of your partners on Facebook (consent is important!), and let them know that unless they change their privacy settings, you’ll be listed on theirs too.
Facebook uses an index number to represent each relationship type not all of these are published. A lot of the numbers are unique to other cultures and languages. Here are the poly-friendly ones that might interest you:
163 – Husband
164 – Wife
223 – Partner (female)
224 – Partner (male)
240 – Family Member
241 – Partner (gender neutral)
Techie Note: We can modify the page your browser has downloaded to send a hidden index number back to Facebook as your new relationship type. So all you have to do is get your browser to send a number that isn’t on the list.
Prep time: 1 minute. Cook time: 3 minutes
Ingredients:
- Desktop computer or laptop
- Google Chrome
- Partners (2 is fine, but add more if you desire)
Method:
- Log in to Facebook
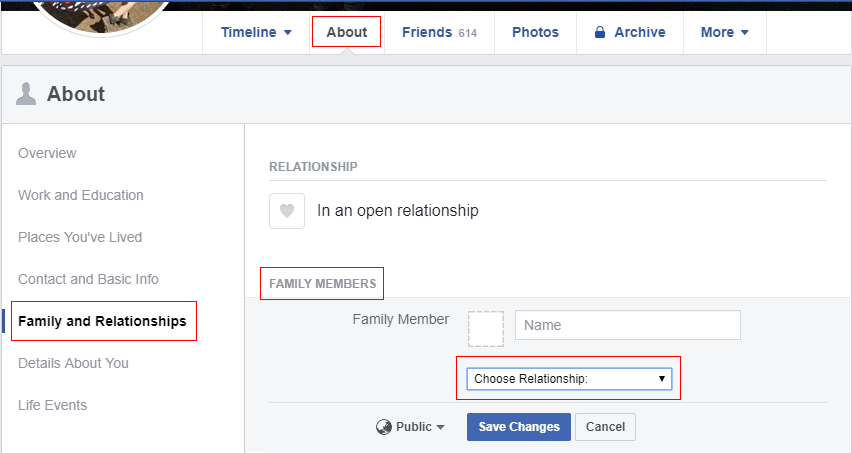
- Open the “Family and Relationships” section on your Facebook (Your profile > About > Family and Relationships)
- Type in your partner’s name and select your relevant privacy setting.
- Right Click “Choose Relationship” and select “Inspect”. The Developer Tools will open at the bottom of your screen. (Don’t panic! It might look like we’re getting super technical, but it’s quick and easy, I promise!)
- In DevTools you should have a the “Elements” section selected with a tag highlighted, it should start with <select class=”relationSector… Click the triangle in front of this to open the branch. If DevTools opens on the side of your screen instead of the bottom, it can be tricky to figure out what you’re looking at, scroll to the bottom of this article to see how to make this appear at the bottom.

Open the image in new a tab if you need it larger 🙂
- The next line you’ve just revealed should be <option value=”0″>Choose Relationship:</option>. Double click on the 0 and enter a different number from the list above.

Open the image in new a tab if you need it larger 🙂
- (optional) Step 6 will add in your desired partner, but “Choose Relationship” will still be shown in the drop down until after you save. If you’re a visual person, “Choose Relationship” (inside DevTools, next to the 0 you just changed) can be changed to your desired partner label. Note: You in this section you can’t add any ol’ label and have it appear after it’s been saved. It’s all based on the number code, this part is just for looks before you save it.
- Exit DevTools by pressing F12
- Click “Save Changes”
That’s it! A request to your selected partner will be sent for them to accept. If they don’t accept, “pending” will just remain beside “partner” but they will still remain on your profile. Once they accept “pending” is removed, and you are also listed in the “Family and Relationships” section on their profile as well. It should look something like this:

Bonus Tip: If you like the big announcement that comes from adding a new relationship on Facebook (through the “Relationship Status” section) and are a bit bummed that this method doesn’t offer that, I have a solution! By going to the “Life Events” section (Your Profile > About > Life Events) you can add relationships this way, and they will show up in News Feeds and on Timelines. Again please make sure they’re OK with the publicity. This shouldn’t affect your actual “Relationship Status” on Facebook, but I am yet to test this.
Notes: I had a bit of difficulty using the gendered codes for the second partner, I ended up just using 241 – Partner (gender neutral) and it worked. My girlfriend also had success adding my meta using the 241 code as well.
If your browser opens DevTools on the side of your screen simply click the three vertical dots in the top right corner, then select the “Dock to bottom” icon.

Open the image in new a tab if you need it larger 🙂


Recent Comments